
The first thing we do before anything else as string players, before we learn to play our first note, is pick up the instrument. Many students start out with terrible habits that become very difficult to break in the future. Keep the following in mind as you develop good practice habits:
Stance
Body and feet
Many students want to sit or stand with the body facing directly at the music. Since the instrument is on the shoulder this creates two problems: the instrument starts to droop down into an incorrect position, or the player of forced to look back and forth between the left-hand fingers and the music. Whether the violinist/violist is sitting or standing the body should be turned about 45 degrees to the right of the music stand, between one and two o'clock. (The body should not be twisted.) The feet will also be facing 45 degrees from the stand. This will make the scroll of the instrument point to the top-left corner of the music stand putting the fingers and music in the same line of sight. Many teachers ask the student to step forward with their left foot, though I do not recommend it! Although this is a stance similar to what I have described, it ends up causing the torso to face forward, twisting the spine and creating the same issues it's trying to solve. If you watch any professional orchestra's violin section you will see that they are slightly turned towards the audience.
Many students want to sit or stand with the body facing directly at the music. Since the instrument is on the shoulder this creates two problems: the instrument starts to droop down into an incorrect position, or the player of forced to look back and forth between the left-hand fingers and the music. Whether the violinist/violist is sitting or standing the body should be turned about 45 degrees to the right of the music stand, between one and two o'clock. (The body should not be twisted.) The feet will also be facing 45 degrees from the stand. This will make the scroll of the instrument point to the top-left corner of the music stand putting the fingers and music in the same line of sight. Many teachers ask the student to step forward with their left foot, though I do not recommend it! Although this is a stance similar to what I have described, it ends up causing the torso to face forward, twisting the spine and creating the same issues it's trying to solve. If you watch any professional orchestra's violin section you will see that they are slightly turned towards the audience.
|
Shoulder rest
The debate between using a shoulder rest or not can be a passionate one. I recommend the use of a shoulder rest for all levels of players. Those who do and do not use one can both agree that the instrument does not sit on the shoulder, but instead rests on the collar bone. Most new students will start with a sponge rubber-banded to the back of the instrument. No matter what kind of rest you are using: a sponge, shoulder rest, cloth, or nothing at all the violin/viola should touch the collar bone. If the player has a long neck, a taller chin rest would be much more beneficial than a taller shoulder rest. If you use a shoulder rest, remember that it's only purpose is to support the space between the shoulder and the instrument, and not to prop it up. Chin rest The term "chin rest" is the cause of most of the confusion among new students about this violin/viola accessory. The "chin" should never actually touch the chin rest. The side of the jaw is what rests on it, and it and helps support the instrument. Putting the chin on the chin rest will either cause a tremendous amount of neck pain, or will draw the violin/viola down towards the front of the body. |
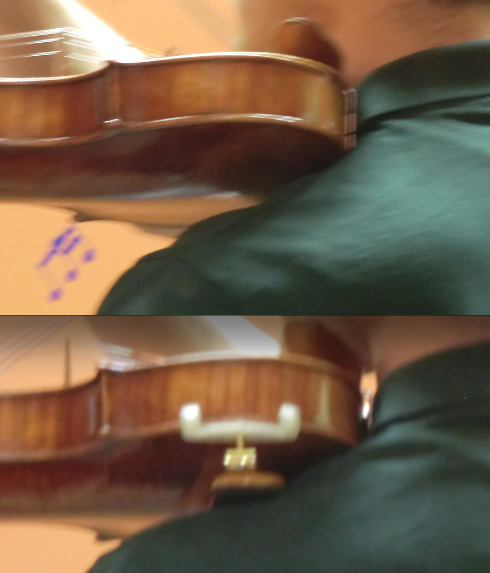
Violin resting on the collar-bone
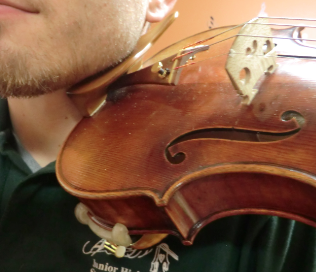
Jaw (not chin) resting on chin-rest
|
Left Hand
|
Wrist
Every beginning student, including myself, has a habit of bending their wrist as if holding up a pizza tray. Most students do it because they feel as if it is the only way of supporting their instrument. A good shoulder rest will help prevent this, but the student must also realize that the violin is supported lightly by the thumb, and the third knuckle of the index finger. I say "supported lightly" because the violin should never be gripped. There should be a straight line from the second knuckle of the left hand down to the elbow. Fingers All four fingers should be nice and curved. The pinky will most likely need to build up some muscle to be adequately arched. The shape of the index finger is often referred to as "three sides of a square." Even when playing a lowered first finger (like B-flat) the finger should still look like a square. |
"pizza" and straight wrist
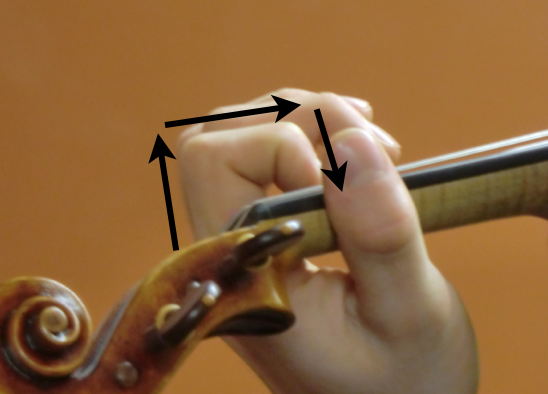
"Three sides of a square"
|
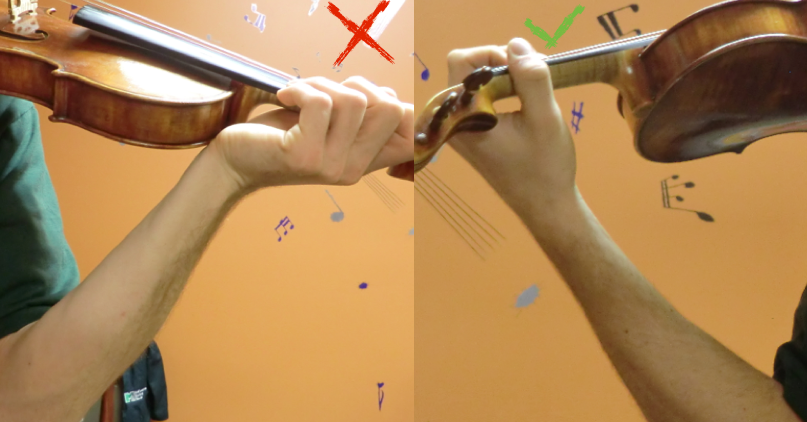
Thumb
The thumb should be around the same place as the first finger, and slightly peaking over the fingerboard (in first through fourth position). If the thumb is too far back behind the index finger it will add unnecessary tension to the fingers. Many violists will move their thumb more towards their middle finger to help with the larger stretches.
The thumb should be around the same place as the first finger, and slightly peaking over the fingerboard (in first through fourth position). If the thumb is too far back behind the index finger it will add unnecessary tension to the fingers. Many violists will move their thumb more towards their middle finger to help with the larger stretches.
Right Hand
Balance
The bow should never be "held" but instead it is balanced between the fingers. Beginning students can find the balance point of the bow (about 1/3 from the bottom of the bow) and balance it on their thumb. From here the fingers should just relax over the bow stick with the middle finger across from the thumb. The bow should be able to act as a teeter-totter between the index finger and pinky while balancing on the thumb. From this point the hand can move down the bow stick so the thumb is between the grip and the frog (not inside the curve of the frog, or on the grip). Now because the weight is not evenly distributed as it would be at the balance point (as described above) the bow should be balanced between the thumb and curved pinky. This can be quite difficult at first because the pinky is using a lot of muscle never previously used.
The bow should never be "held" but instead it is balanced between the fingers. Beginning students can find the balance point of the bow (about 1/3 from the bottom of the bow) and balance it on their thumb. From here the fingers should just relax over the bow stick with the middle finger across from the thumb. The bow should be able to act as a teeter-totter between the index finger and pinky while balancing on the thumb. From this point the hand can move down the bow stick so the thumb is between the grip and the frog (not inside the curve of the frog, or on the grip). Now because the weight is not evenly distributed as it would be at the balance point (as described above) the bow should be balanced between the thumb and curved pinky. This can be quite difficult at first because the pinky is using a lot of muscle never previously used.
|
The "flop" There are countless creative ways to introduce bow holds. Many teachers will have students make a "bunny" shape by bringing the middle and ring fingers down to the thumb while keeping the pink and index fingers up. This is a great way of showing that the middle fingers and thumbs should be close together, but forces the student to use muscles that are not necessary. I like to introduce the "flop" for demonstrating bow holds. I ask that the student just flop their hand over the grip of the bow around the second knuckle. I sometimes refer to this as the "zombie-flop" depending on the student. When the student just flops their fingers over the bow the muscles stay relaxed. |
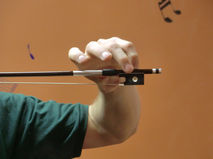
Balancing on the pinky
|
From here I ask that the student lightly touch the tip of their thumb to the stick directly below the middle finger, and finally touch the tip of the pinky to the top of the bow. I often see students with fingers unnecessarily stretched out with the pinky all the way to the screw of the bow. The creates a large amount of tension in the right hand and will prevent and further bow technique. The pinky should rest just above the pastille, or eye of the bow.
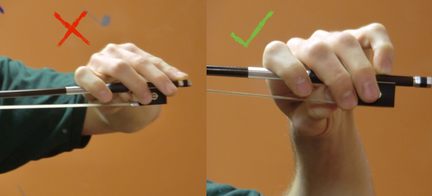
Bow Arm
While bowing, the upper arm should stay relatively stationary unless changing strings. The forearm, wrists, and fingers work together to keep the bow parallel to the bridge. There are variations on the standard bow hold, but they are all very similar. While on the lowest string (G for violin, C for viola) the bow and arm should be even with the ground.
While bowing, the upper arm should stay relatively stationary unless changing strings. The forearm, wrists, and fingers work together to keep the bow parallel to the bridge. There are variations on the standard bow hold, but they are all very similar. While on the lowest string (G for violin, C for viola) the bow and arm should be even with the ground.
Stay relaxed!
The most important thing is that the body stays relaxed, and the instrument is up. The position of the arms and body will feel new and foreign to a new student. Although odd, it should never be uncomfortable. The more comfortable the body is, the easier it will be to play.